Showing posts with label Tutorials. Show all posts

A sewing box for someone special ...♥

This is one of those projects that sat unfinished for years. Sometimes I get to a point of making something and I don't know how to finish it. I just have to wait until I discover something that will give me the answer to forge ahead. Until then I'm stuck and the project sits on the shelf. Originally I planned to wrap the box in felt and embroider the door, windows and flowers with my machine but then I found the magic of iron-on appliques. This was much easier and the perfect solution to finish this cute heirloom sewing box.

The wooden box itself can be found at any craft store in a variety of sizes and styles. I removed the hardware, sanded and painted the box with white craft paint. For the roof I constructed a wood base made in balsa in the shape of a triangle. The roof base is about a 1/2" shorter on each side to accommodate the foam to hold the pins. 1/2" green rubber foam is cut to size and placed on each side of the wood roof base. I finished the roof with a pink felt covering and scallop shingles cut with my rotary blade for additional charm.
The doors and windows are ironed on with an applique product called Lite Steam-A-Steam 2. The die cut flowers, ric-rac and trim were glued on. The topiary pin cushions were needled felted and placed in a tiny wood barrel on a stick.
I made the adorable spool mice with a wood ball for the head and the body is a painted thread spool wrapped in my favorite ribbon. The face was painted on with craft paint and sprayed with a clear varnish. I finished the head with felt ears glued onto the head.
The pin box and button box are a simpler version of the larger box and fit nicely in the sewing box above. The pin cushion was made with a piece of rubber foam cut to size to fit the box. I placed a piece of chipboard underneath the foam, wrapped it like a present with a piece of polka dot cloth and glued it to the top of the painted box. For the button box I again used the applique paper to adhere the gingham cloth to the box. The buttons and trim detail were glued to the box.
The pin topper flowers were made with two diecut flowers with a pin pushed through the center and a small circle of felt underneath to keep the petals from sliding off the pin.

Jack in the Box Ornament Freebie

This happy elf was inspired by one I made long ago for my first craft show when I was kid. The original was made as a soft sculpture in nylons and plastic canvas. Those were the popular crafts at the time.. gives you an idea how long ago it was. :) This one however can be printed from your home computer on heavy cardstock. Enjoy and Merry Wishes!

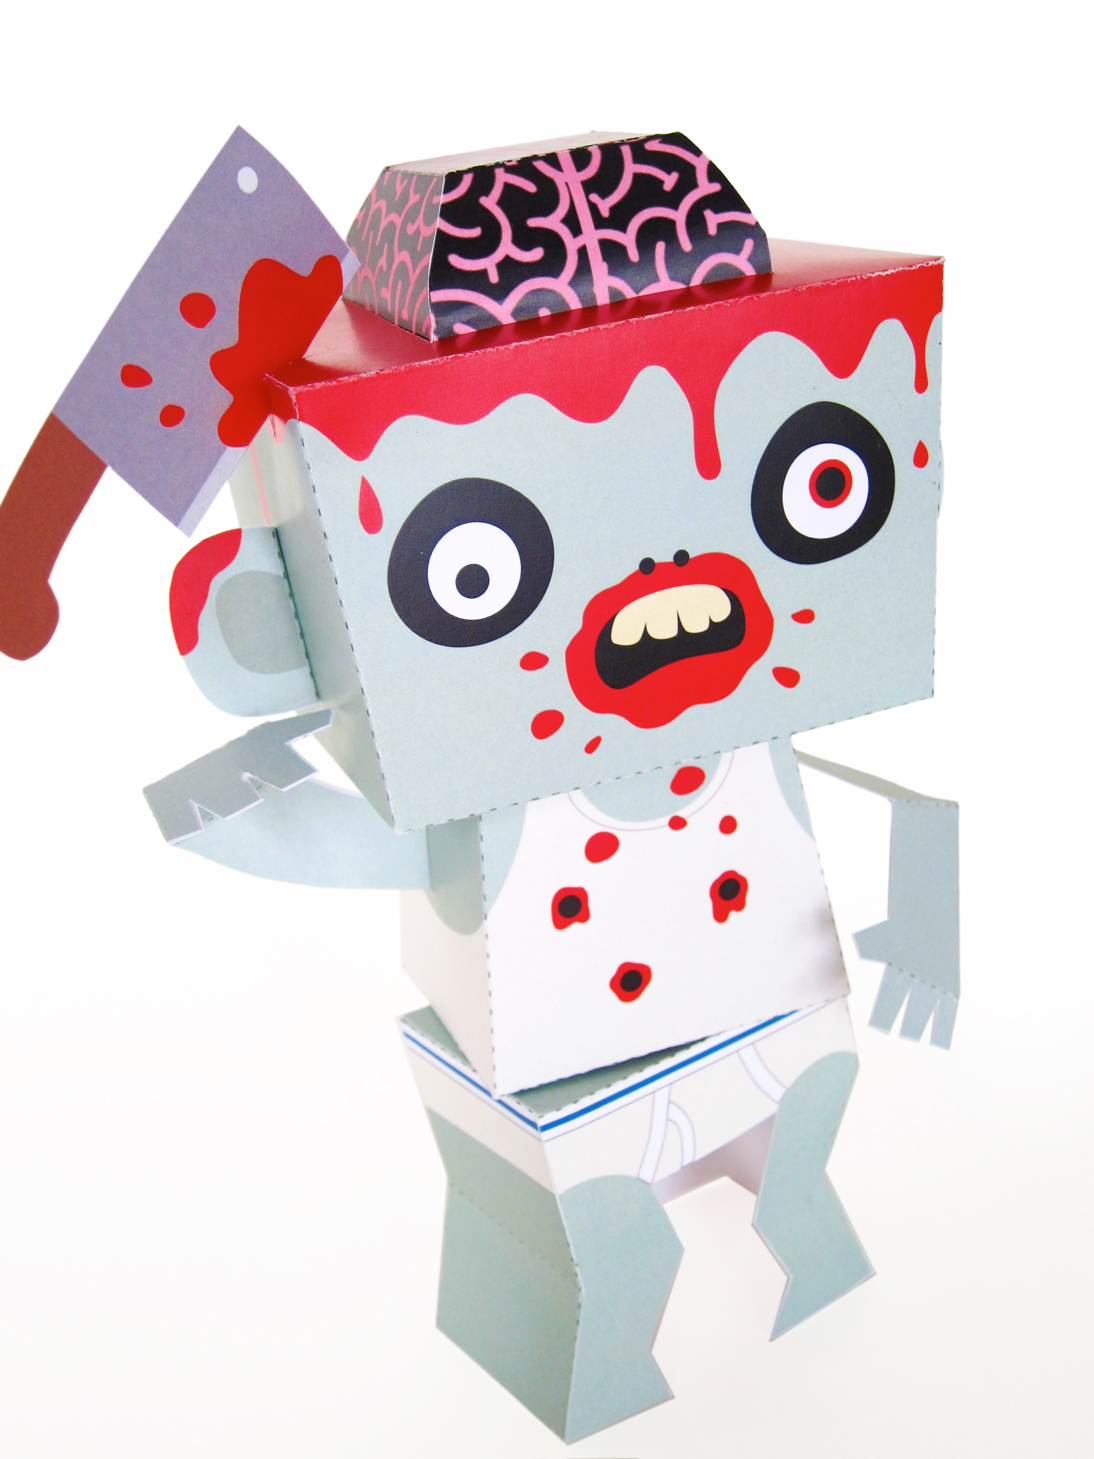
Free Zombie Paper Toy

Autopsy Zombie with Removable Brain featured at Night of the Exquisite Corpse show is now available for free. I hope hes not to scary or gross ..maybe  a little cute but gross... anyways hes inspired by two of my favorite shows the Walking Dead and Dexter. Body parts are removable for autopsy fun!


New Craft Book ~ Kids Crafternoon Felting

This was a great side project I did last winter. I was asked to create a tutorial in a felting craft book. Its part of series of craft books called Kids Crafternoon published in Australia. My assignment was to construct a money bank out of a mailing tube. Hmmm, well it seemed like a challenge until I decided to take advantage of the shape and make a cute wiener dog. His doggy coat is easily removed to reveal a hidden money slot to save your coins for a rainy day. 
I'm very pleased with the way the book turned out and glad to be a part of it. The editor was a dream to work with! The colorful and beautifully photographed book features 25 felt projects for a crafty afternoon. Robots, ipod animals, zombie critters and of course the dachshund money bank I designed are just a few of the items featured. Check it out!


Product Review ~ Puffies

I recently discovered these miniature felt Puffies at my local Archiver's scrapbook store. They are so cute I had to get them. I wasn't quite sure what to do with them until I visited their website and found some creative ideas. They are meant for scrapbooking because they have an adhesive backing but can be utilized for other craft projects as well. A friend of mine is a having a baby girl and I thought that this would be a great gift for the baby's room. I also did some Paris themed wall hangings to honor my upcoming trip. Check out the whole Puffies product line with many fun themes.

Amy Powers Latest Happy Birthday Issue


I just love the way Amy puts together the pages of her online craft magazine. Its so fun and creative! I was lucky to be included in the last issue and now I'm in the current Happy Birthday issue. My popular cupcake softie tutorial is featured with a bunch of other Birthday ideas. To purchase the online 244 page issue of Inspired Ideas craft magazine click here.

Inspired Ideas Springtime 2011

If your looking for some "Inspired Ideas" for Spring or if you just like good design, you will LOVE this online craft magazine by Amy Powers. Its the cutest craft magazine around and just a delight to look through! This issue features over 20 projects from some of the craft industry's most creative talents. My pom pom bunnies are featured along with ideas for Valentines Day and Easter. Subscriptions can be purchased here for a small fee.


Printable Paper Crafts - Tools for Making Paper Toys

Printable paper toys are a fun and inexpensive way to craft. Printables are often available as PDFs and can be downloaded for instant gratification in minutes. To those of you who are new to printable paper crafts I thought I would have a couple of tutorials available to help educate the basics of paper crafting. If you're into scrapbooking and paper crafting I'm sure you have these items on hand. Most of these tools can be purchased at your local office supply or craft store.
Tools for making printable paper toys. Starting from the lower right going counter clockwise.
1. TOOTHPICKS I use toothpicks to put a thin layer of glue on the tabs for gluing. I will put a dollop of glue on some scratch paper and load the toothpick up with some glue. I then layer the glue on the tab as if I was buttering a piece of toast. If you use large amounts of glue especially on large shapes and tabs the glue will tend to warp the cardstock. This is why I prefer this method.
2. SCORING TOOLS Scoring tools are necessary for precisely folding a paper toy. Scoring is making a slight indentation in the cardstock so it easily folds. My favorite tool of all time is a 5" tapestry needle I found on clearance at the craft store. I have used this tool for sculpting small details on dolls and now I use it for scoring all my paper toys. I have also included a bone folder in the photo which is commonly used to score cardstock. Some other tools that can be used to score cardstock are a blunt knitting needle, dried up pen or edge of a paper clip.
3. CRAFT KNIFE A craft knife/X-acto knife is used for cutting small details that a scissors could not do. Most of my paper toys do not require one but I will occasionally use one for cutting small bits out. A craft knife should always be used with adult supervision. They are very sharp and not recommended for children.
4. SCISSORS I have two pairs of scissors for paper crafting. I use the large pair for cutting out large shapes and the small pair for small detailed cutting. The small pair of scissors is invaluable for getting around tiny shapes and corners.
5. RULER A stainless steel ruler is used to assist with scoring a printable toy. I will run my scoring tool along side a ruler to make a straight crisp fold. A plastic ruler will work in a pinch but a stainless steel ruler is best because a plastic ruler will often chip or be cut into by a craft knife.
6. SELF HEALING MAT A self healing mat is used when cutting the cardstock with a craft knife. It will protect the surface you are working on. It is not necessary, as a piece of cardboard will work as well.
7. CRAFT GLUE My favorite glue is Aleene's Tacky Glue. I use this glue for felt appliques and paper toys. Its tacky enough to hold two pieces together and dries quickly with cardstock. Two paper pieces will bond together within 30-45 seconds. I have never used anything else but have heard most white glue will work.

Not pictured here:

8. CARDSTOCK 8 1/2" x 11" heavy weight 60lb. -110lb. cardstock is what I recommend to print paper toys on. The cardstock I buy at my office supply store is labeled white index.
9. COLOR PRINTER Any color printer will work fine when printing a printable. I use a home ink jet printer for designing my paper toys. When I'm finished with the design I will put the document on a flash drive and bring them to my local printer for printing. A professional printer will bring out the vivid colors a home printer will often not. I am often asked if you need color cardstock for the paper toys. A color printer will print out the solid colors and additional color cardstock is not needed. I design all my paper toys as color documents to be printed on white cardstock.

Mushroom Pin Cushion Tutorial


Mushroom harvesting season is here and I thought this would be a good time to share my Mushroom Pin Cushion Tutorial. This cute pin cushion reminds me of something granny would have kept in her sewing box. Its a fairly simple project that requires a bit of sewing and a hot glue gun. I purchased all the supplies at my local craft store. Happy crafting!


Materials Required

Polka Dot Fabric
2 1/4" Diameter Wood Disc
1 1/2 " Wood Candle Cup Holder
Mini Ric Rac
Hot Glue or Craft Glue
Wool Roving for Stuffing


Instructions
1. Cut out a 7 1/4" diameter circle in your favorite polka dot print.
2. Sew a gathering stitch around the edge of your circle.
3. Pull your gathering stitch to create the mushroom cap. Pack cap with wool roving. Pull gathering stitch tight, close and knot. (A polyfill will work but wool filling is much better. Wool will make a stiff cap that will hold your pins in place. A poly fill will make a squishy cap but will still work.)
4. Glue candle cup holder to wood disc to make mushroom stem.
5. Put a layer of hot glue on top of the wood disc and quickly push mushroom cap onto disc and hold into place until the glue dries. Hot glue typically dries in under a minute.
6. Glue a piece of ric rac around the edge of the wood disc for decoration.
7. Finish the mushroom with a cut felt flower and a pretty pin.

For personal use only. Commercial use prohibited.

Free Printable Pink Paper Fawn

This pink fawn has been with me since the beginning of Fantastic Toys. One of the first plush toys I made was this darling. After posting pictures on Flickr I received so much positive feedback I knew I was on to something. Since then Fantastic Toys has grown to include many soft toys, paper toys, fabric and kits. My ideas for new toys are endless and I hope the next 5 years will be just as productive and successful.

For those of you who have always wanted a fawn from Fantastic Toys I am offering this special paper version just for you. This 3 page PDF includes fawn, two mushrooms and instructions for assembly. I recommend printing on 60 lb. or more cardstock. Thanks to all of you that have supported Fantastic Toys over the years with your kind comments and feedback. Enjoy!


Pom Pom Bunny and Mushroom Egg Tutorial


Just in time for the Easter holiday, a simple and sweet Easter tutorial! This has to be my easiest crafty tute so far. The young ones will be delighted with this cute little bunny and mushroom egg.The bunnies are made with three different sizes of pom poms and a bit of felt. I purchased the wooden eggs for the mushrooms at Michael's. The wooden eggs are great because they're already painted white and they have a flat bottom to stand upright. You could also use blown eggs which can be a bit messy and quite tricky. Another option is to put a string on the mushroom egg to hang from your Easter tree.
Have fun and Happy Easter!


For personal use only. Commercial use prohibited.

Download Instructions and Pattern

Materials Required

Red, White, Pink, and Black Felt
1/2”, 2”, 1 1/2” Pom Poms
Wooden or Blown Egg

Instructions

1. Print pattern and cut out pattern pieces.
2. Pin or trace pattern pieces onto felt scraps and cut out felt pieces from pattern. Use a paper punch to punch out bunny nose and eyes.
3. Glue ears to back of 1 1/2” pom pom. Assemble bunny together using 2” pom pom for body and 1/2” for tail. Glue bunny face to head.
4. Create mushroom cap by overlapping access to create wide cone. Glue felt spots to mushroom cap.
5. Finish mushroom egg by gluing felt cap to wooden or blown egg.


Don't forget last years Easter freebie!
Download Printable Easter Cone

Baby Bunka Printed Cloth Doll Tutorial

Baby Bunka loves lollipops and her little Scotty dog.
Will you be her Valentine?

Baby Bunka and her little Scotty are printed cloth dolls made with computer printer fabric. If you haven't heard of computer printer fabric its fabric paper you can run through your ink jet printer and print directly onto the fabric. It has a variety of uses such as pillows, quilting and of course I use it to make toys. I purchase mine at the local Joanns in the quilting section. Otherwise Dharma Trading Co. is a good source to find it online. Computer fabric paper will only work with ink jet printers. It will not work with laser printers. Enjoy!

For personal use only. Commercial use prohibited.

Materials Required

Computer Printer Fabric
Calico Print Fabric
Polyfill
Ink Jet Printer
Instructions

1. Print PDF onto computer printer fabric. Follow instructions from the printer fabric you purchase.
2. Cut out doll and pin right sides together to calico print of your choice. The back side of doll will be a nice print or solid color. Cut out calico print around the doll.
3. Sew doll together with about a 1/8” seam leaving a small opening for stuffing.
4. Clip Curves. Turn right side out. Stuff Bunka with polyfill and close opening with a ladder stitch.
5. Repeat process for Scotty dog and lollipop. Use a wooden skewer or toothpick for lolli stick.


Felt Christmas Ornament Tutorial

 My project is featured on Michaels website. Please rate my project to increase my chance at winning a chance to be on the Martha Stewart Show. Go here to rate this project on Michaels website.

Your family and friends will love these vintage inspired felt ornaments. This is a great holiday craft project to make with left over felt scraps and trim. You can sew them by hand, sewing machine or the younger ones could even glue them together. Finish them up by adding some ric-rac, trim or felt shapes.


Materials RequiredCraft feltRibbon, ric-rac
Craft glue

Needle/Thread
Polyfill stuffing
Pins
Leave a comment and email address to qualify for the free giveaway of the ornaments pictured. The 2 page PDF tutorial contains the pattern, complete instructions and photos with finished examples.
Please make these ornaments for family and friends. They are not meant to be sold. Merry Christmas!

Download Christmas Ornament Pattern with Instructions.

Five Fun Freebies from Fantastic Toys

Pin It

This is the sweetest set of paper toys. It would make a great activity for a rainy day or when the kids are getting a little bored. The shapes are fairly simple to cut out so even the younger children can give it a try.

I have designed two new toys to go with my original set. The Gnomie Paper Doll has got to be my favorite. While she wears a nightie for bedtime she also has three additional outfits to wear. One outfit is for apple picking, another for gardening and a cute little dress she wears while naturing animals.

Also included in the gnome inspired paper toys set is a movable paper puppet, three finger puppets, a hanging mobile and a fun game of gnome bowling.

Only a couple of household materials is required to make the paper toys. Download the set to your home computer and print on 60 lb. cardstock at your convenience. Have Fun!


Materials Required

Cardstock
Scissors
Tape
String
Paper Fasteners
Wooden Ball


Hanging Mobile


Gnomie Paper Doll with three outfits.

Cat Toy Critters Tutorial


I made this cat toy tutorial quite a few years ago. I thought it would be fun to post in on my blog since I didn't have one at the time. Please remember I have designed these for personal use only. Make as many as you want for friends and family but please do not sell them under any circumstances. Have fun!

Your Kitty's gonna love these Cat Toy Critters. Fill em with catnip or hang them from a string. Stinky will think your the cats meow.
Materials Required
Assorted colors of craft felt

Embroidery floss or thread for stitching

Glass beads for eyes (OPTIONAL)

Fiber fill or cat nip for stuffing


Choose a critter and cut out pattern from the paper. Pin pattern pieces to the felt and cut out accordingly. Sewing- A ladder stitch is recommended for best results.

1. Start out by sewing bird belly to one side of bird half and continue up and around over head until you reach the tail.
2. Continue on with the tail in position until the end, knot, then finish the other side of tail.
3. Now go back and finish sewing the other side of the bird belly. Wow you can see the bird taking shape!

4. Sew about 3/4 of the bird base on leaving enough room open to stuff bird.
Fill with fiber fill or a premium catnip, finish sewing base on. 5.Now your ready for the eyes and wings. Knot thread to position of eye, slide on glass bead and go through to other side and slide on other the bead, pull tightly to create small indentation in felt. Go through a couple of times to securely fasten eyes. (You may choose to glue felt eyes on instead to prevent any injury to your cat.) Clip wings to give the illusion of feathers then fasten to bird body as indicated on pattern. 6. Stitch on bird feet. Voila your finished!! Now go make the other two critters, the same technique may be applied to those as well.

Cupcake Softie Tutorial


Make a yummy cupcake in your favorite flavor. Decorate it any way you wish, add frosting, sprinkles or fruit. Share a cupcake with a friend or family member.
Celebrate your LOVE of cupcakes.

A PDF version with instructions and pattern is also available for download.

I'd love to see photos of your delicious creations! Post them at the flickr group I created.
http://www.flickr.com/groups/665113@N22/

Please do not sell the cupcakes. They are to be made for your enjoyment and given away as gifts to family or friends. Please ask me if you can use my photos or tutorial before you post them anywhere else online.

Materials Required
Craft felt
Craft glue
Needle/Thread
Trim-ribbon
Polyfill stuffing
Embroidery floss
Pins

Instructions
Cut out felt from pattern pieces in your favorite flavor and cup color.

1. Sew up cake side with a backstitch.
2. Gather cake base with a gathering stitch.
3. Stuff cake full with polyfill and pull opening closed with gathering stitch. Secure thread with knot.
4. Sew baking cup side. Pin cup base to side and sew together.
5. Glue eyes on and embroider mouth with embroidery floss.
6. Decorate cupcake to your liking. Add sprinkles, frosting, or strawberries. Add trim or ribbon around cup. Have fun!

Related Posts Plugin for WordPress, Blogger...